Hidden Folder in Laptop, While they often don’t take up much space, the operating system by default hides some system files to prevent you from making unwanted changes. However, they most likely include hidden files and directories if you feel a drive on your laptop is using up a lot more space than it should.
You merely need to turn off the Hide option to make them visible again. If you don’t know where the hidden folders are, you can use PowerShell commands to specifically list only the hidden things and their precise locations.
Read More: Lenovo Releases The First-Ever Dual-Screen Foldable Laptop
Hidden Folder in Laptop, Choosing a Folder View.
By adjusting the Folder view settings, you may make any hidden folder on Windows visible. As a result, you can quickly recognize them since they differ from conventional folders in that they have a faded appearance. A better choice would be to use PowerShell to look for the specified hidden folder if it is deeply nested on your laptop drives. Later, more on this.
But if you already know where the hidden folders might be, you can use this technique to find them and unhide them.

With Windows 10
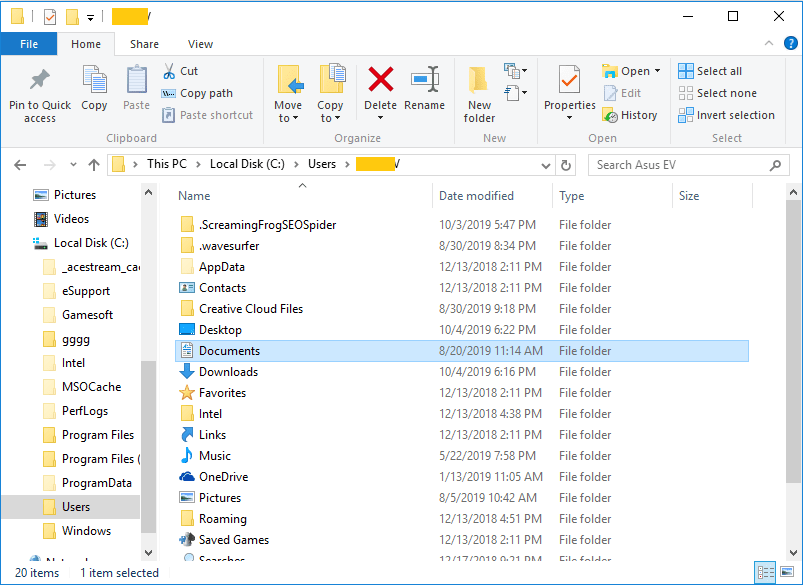
- Windows + E will launch File Explorer.
- At the top, select View from the menu.
- Check the box next to Hidden objects to instantly enable seeing hidden folders.
- Choose Options to get more Unhide options.
- Next, select the Show hidden files, folders, and drives option under the View tab’s Hidden files and folders section.
- To reveal the hidden system files, uncheck the box below that says Hide protected operating system files.
- Click Apply and OK.
Hidden Folder in Laptop, With Windows 11
- To launch File Explorer, press Windows key + E.
- Click View in the top bar and choose Show > Hidden things to quickly reveal hidden objects.
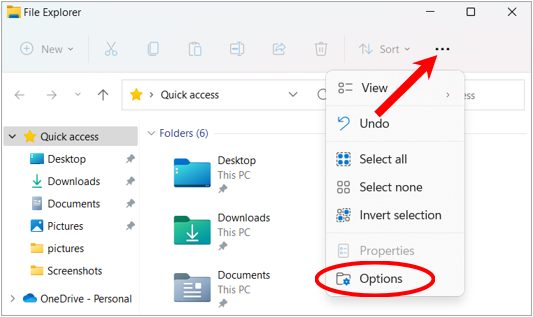
- Select Options from the menu that appears when you click the three dots next to View.
- Then click the View tab, and under Hidden files and folders, select Show hidden files, folders, and drives.
The hidden folder will be visible while the aforementioned options are enabled but will vanish once they are turned off. To eliminate them from the list of hidden folders,
- Properties can be chosen by right-clicking the hidden folder.
- Uncheck the Hidden checkbox under the General tab.
- To save changes, click Apply and OK.

PowerShell usage
Hidden Folder in Laptop, The best tool for locating hidden folders is PowerShell. You can customize your search for hidden folders list by specifying a number of options in addition to executing different commands on it. By explicitly stating the folder path in the command, you can even focus the search.
When you have a lot of directories, subdirectories, and folders, this strategy comes in extremely handy.
- To launch PowerShell as administrator, enter Windows + R, type powershell, and then press Ctrl + Shift + Enter.
- Then, to view hidden directories, use any or all of the following arguments.
- D:Directory -Force -Recurse -Depth 2 Get-Childitem
Get-Childitem in this case: Shows every item in a folder or directoryPath: Enter the location of the hidden folder or directory (such as the D:Directory path above).
Displays all of the hidden files and folders by force
Recurse: Looks through all the folders, subfolders, and directories along a given path.
Depth: Aids in determining the depth of the directory search that you want to conduct. - When you locate the hidden folder you were looking for, go there and use the File explorer approach described above to reveal it.
Hidden Folder in Laptop, Using Applications from Third Parties
You can also utilize a variety of applications from third parties that provide you a graphical user interface. These tools can scan the entirety of your laptop and show you every hidden folder there is, along with where it is.
Similar to this, different search tools can locate such folders even if you have the conceal option turned on. But before you can examine them while using the search tool, you might need to disable the conceal option if the files inside them are hidden.


One Comment