
A highly useful function for capturing actions you carry out on your device is screen recording. This function is frequently used by users to share gaming or as a teaching tool. Given its popularity, the Chromebook operating system has this capability.
We have produced thorough instructions on how to use the screen recording capability on a Chromebook if you have converted from a new operating system to one and are not familiar with it.
How can I record the screen on a Chromebook?
In ChromeOS version 89, a number of new capabilities were included along with a redesign of the screen recording function. Since screen recording is now much more frequent, the Screen record option has its own place on the menu.
Read More: 6 Free Online Video Editor Without Install and Good Quality
Using the Built-In Screen Recorder
ChromeOS contains a feature that lets you record the screen that is now visible. The built-in app is considerably simpler to access and utilize. Learn how to screen record on your Chromebook by following these steps:
1. Click on the bottom right corner to reveal the menu.
2. Pressing the arrow will expand the menu.
3. Click the button for screen capture. By hitting Ctrl + Shift + Show Windows, you can also instantly start this programmed.


4. Next to the camera symbol, click the video icon.
5. A bar with several recording controls will appear at the bottom of the screen. Choose from Record window, Record full screen, or Record partial screen.
- Fullscreen: To capture the entire screen,
- Screenshot in part: to capture a specific area of the screen
- Window: To capture a particular window
6. To begin screen recording, press Record or anywhere on the screen. A countdown on the screen indicates that the recording is about to begin.
By selecting the Settings icon and turning on the Record Microphone option, you can add your own sounds to the screen recording.
7. The bottom right corner of the screen will show a red indicator to indicate that the screen is currently being recorded. To halt the recording, click the red icon.
The video recording will be saved as a file in your Chromebook’s Downloads folder. When the screen recording is complete, a notification will appear that you can click to access the folder. Follow these steps to modify the save location:
1. Press the keys Ctrl, Shift, and Show Windows.
2. Select the settings button.
3. Select the location you want to use by going to Select folder.
Screencast App use
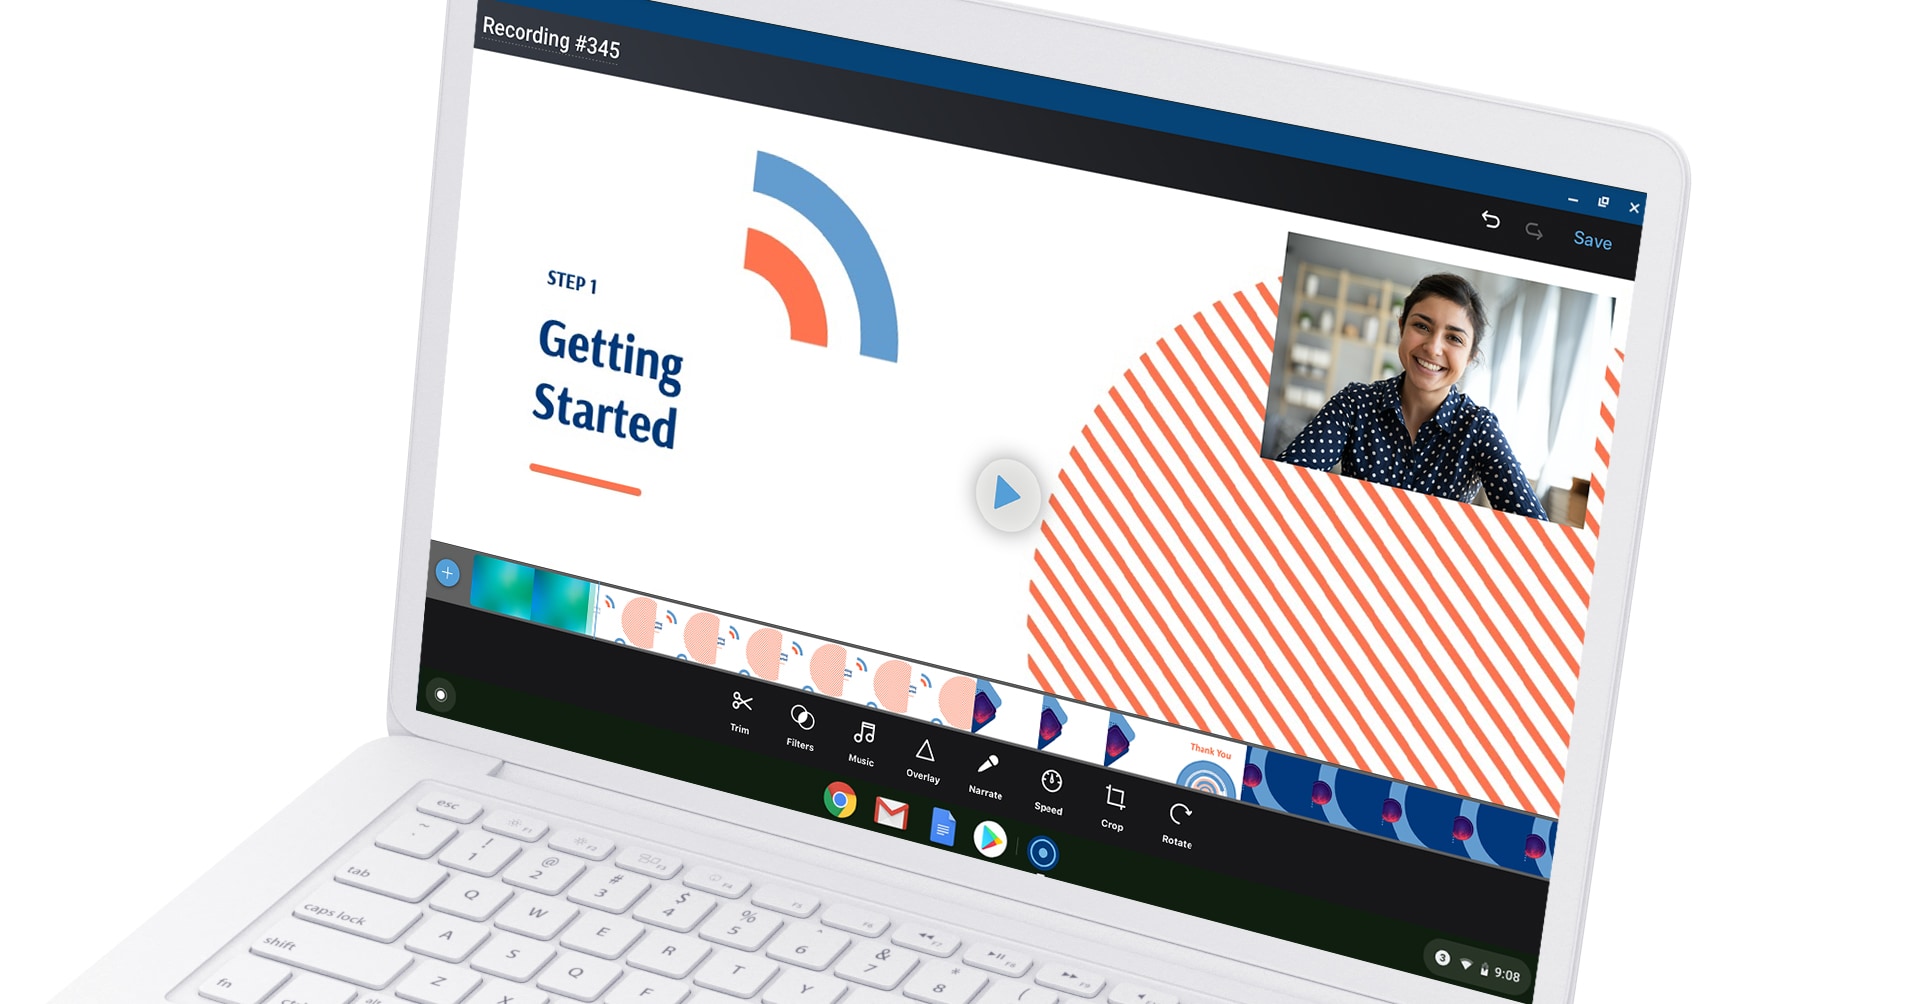
Record the Screen on a Chromebook: The Chromebook PC now includes a new software named Screencast following ChromeOS version 104. It comes pre-installed and also has the ability to record your screen. To use this app, you must sign in with your Google account. Any recordings made with this app will be saved to the associated Google Drive account.
Comparing screencast to the built-in record capability, there are various benefits. The ability to add a webcam recording alongside the recording screen is one of its most obvious benefits. Additionally, you can doodle on the recorded video to highlight particular sections. The users can easily provide more information to the viewers thanks to these features.
1. Open the Screencasting program.
2. Then select New Screencast.
3. Select whether to record a window, a complete screen, or both.
4. This app already has the webcam and microphone turned on. By selecting the setting icon, you may modify these settings.
5. Clicking anywhere will begin screen recording after you confirm your recording choices.
6. To cease screen-capturing, click the red icon.
Making Use of Browser Extension
A Chrome browser is pre-installed on a Chromebook. To record your screen, you can also add a browser extension. You can record the screen using the new recording features that the browser extension will add to your browser. To add a browser extension, adhere to these steps:
1. Chrome should now be open.
2. Check out the Chrome Web Store.
3. Look for a screen capture recording.
4. Double-click the preferred extension. If you’re having problems deciding, read their reviews.
Click Chrome Add.
5. On the pop-up, click Add extension.
6. The Extensions button next to the address bar gives you access to the extension capabilities.

Apps from Third Parties
For your Chromebook, there are many apps that offer screen recording capabilities. You might be able to alter the recordings using additional tools that some apps may have. A screen recording app is available for download from the Playstore. If you’re unsure which app to choose, read the review to gain more knowledge about it.
Read More: Chrome Built-In Screenshot Tool for Android
How Can a Chromebook Take a Screenshot?
The in-app feature also allows you to take a screenshot. A screenshot will take a picture of the screen while the screen record function records the screen in real-time. Screenshots will also be saved in the same location as screen recordings.
On a Chromebook, follow these steps to take a screenshot:
1. Launch the menu, then select Screen capture. Ctrl + Shift + Overview will also open this programmed straight.
2. A camera symbol should be chosen.
3. Select from Record window, Record full screen, or Record partial screen.


3 Comments