Microsoft Word is a powerful word processor that may appear daunting to new users. Although independent exploration is possible, several recommendations can facilitate the process. Here are a few recommendations to start your project.
The Basics of Text Formatting
To create professional and aesthetically pleasing documents, one must acquire basic formatting skills. Let us examine the tools available on the “Home” tab for this purpose.
The Font area allows for modifications to the style and size of the font, as well as the enhancement of text through bolding, italicising, and underlining. Additionally, you can modify the font colour and accentuate the words for greater emphasis.
In the paragraph section, you can modify the alignment (“Left,” “Center,” “Right,” or “Justify”), line spacing, and indentation of the text. This section may also be utilised to incorporate bulleted or numbered lists. Borders can also be inserted around your paragraphs here.

The Styles area allows for the maintenance of consistency and structure in your work through the insertion of headings, titles, quotations, and various text components.

For a Professional Look Try Using Templates
To save time in Microsoft Word, use templates to rapidly generate professional-quality papers. This approach eliminates the necessity of starting from the beginning. Simply load the template and modify it to meet your requirements.
One may choose a template when starting a new document. Select “New” in the left sidebar and utilise the search bar on the right to locate the desired template.


After finding it, select the template and then click “Create” to generate a new document based on that template.
Enable AutoSave
To minimise the risk of losing your work due to document closure or computer failure, it is advisable to activate the AutoSave feature. This automatically saves the document with each edit and subsequently uploads it to OneDrive, provided your computer is connected to the internet.
A Microsoft account is required to utilise OneDrive. After completion, you can activate this option by toggling “AutoSave” in the upper-left corner of the screen.

You will be required to log in to your Microsoft account. Select your OneDrive account at completion. Subsequently, designate the document’s name and select “OK” to store it in OneDrive.
After completion of typing, the modifications will be automatically stored in the cloud. The advantage is that the document will be synchronised across devices, including Mac, Android, and iOS, allowing access from any location.
Use Voice Typing
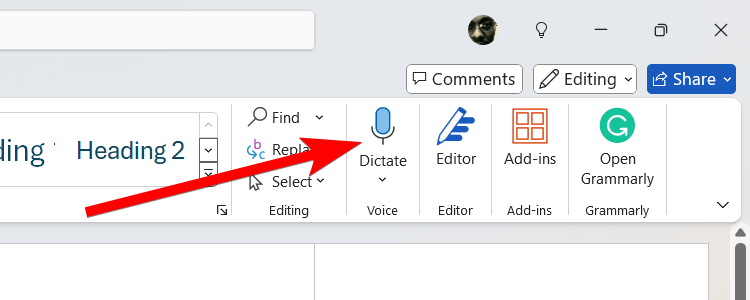
Word has a dictation function that efficiently transcribes spoken language into text. It facilitates the effortless capture of your ideas and alleviates the burden of typing.
Select the “Home” tab and click “Dictate” in the voice area of the ribbon to proceed. Commence speaking, and your verbalisations will be transcribed into text.
After its completion, select “Stop Dictation” in the widget that opens when you start dictation.
To change settings like the spoken language and microphone choice, click on the gear icon that represents “Dictation Settings.”
Related: 7 Microsoft 365 Hacks That You Need to Know
Adjust the Layout of Your Document
The Layout tab in Word enables straightforward customisation of your page configuration. This can be utilised to produce precisely organised and aesthetically professional documents.
In the Page Setup group, you can configure the margins, the surrounding space of the document, and the page orientation (“Landscape” or “Portrait”).
You can adjust the document size to accommodate your intended screen or paper dimensions. Simply select “Size” and choose one of the available options.

You can divide your text into columns by selecting “Columns” and choosing “one,” “two,” or “three” from the menu. The “Left” and “Right” choices align the first column in the selected direction and thereafter reduce its width.
In the Arrange tab, you may adjust the positioning of inserted elements (e.g., photos, shapes, and charts), wrap them within text, or designate them as background or foreground elements. Additionally, you can modify their alignment or rotate them.
Use the Review Features During Collaboration
The Review tab has tools that facilitate collaboration in Word. The most essential aspects to understand are the incorporation of comments and the monitoring of alterations.
To insert a comment, choose the text you wish to annotate and click “New Comment” in the Comments part of the ribbon. In the Comments window on the right, compose your message and thereafter click the blue “Send” button.
The tracking changes function enables users to propose modifications to the document rather than making direct edits. You and your partners may thereafter evaluate the modifications and either accept or reject them.
To start change tracking, select the “Review” tab and click “Track Changes” inside the Tracking portion of the ribbon. Suggestions will now be shown in a distinct colour when typed. You may thereafter choose the suggestion and click “Accept” or “Reject” in the Changes area of the ribbon to incorporate or exclude it from the final text.
Improve Your Writing By Using Editor
In addition to the review features, you should also utilise the Editor function. This AI-driven application enhances your writing by addressing spelling, grammar, clarity, conciseness, and style.
To utilise it, navigate to the “Review” tab and select “Editor” inside the Proofing part of the ribbon.
A panel will emerge on the left, displaying an Editor Score. This will include amendments and recommendations to align the paper with your desired style and tone—aim for a score of 100%.
Change the style and tone by opening the “Formal Writing” section and selecting either “Formal,” “Professional,” or “Casual” from the menu.
Related: How to Change Microsoft Account on Laptop: 14 Best Ways
Install Productivity Add-Ins
Enhance your efficiency in Word by installing add-ins, which are little applications that introduce customized functionalities. These can assist you in optimizing work in Microsoft Word.
To install an add-in in Microsoft Word, navigate to the “Home” tab and select “Add-Ins” inside the Add-Ins area of the ribbon. Select the “More Add-Ins” button located at the bottom of the pop-up to access the store.

Locate the add-in in the “Search” box and select “Add” beside the desired option for installation.
In the prompt, select “Continue” to install the add-in. For certain add-ins, you may need to accept the terms and conditions prior to installation. To activate a plugin, click the “Add-Ins” button once again and choose it from the pop-up menu.
Enable Document Protection
Word can protect your documents against unwanted access and modifications, which is particularly beneficial if they include confidential information.
To activate document protection, navigate to File > Info and select the “Protect Document” option. Subsequently, select “Encrypt With Password” from the displayed option.
After that, you will be needed to enter a password and ensure that it is correct. It is important to bear in mind that if you forget this password, you will not be able to access the document again. Therefore, it is important to select a password that is easy to remember or to store it in a secure location.
Conclusion
To get you started, here are some fundamental pointers to keep in mind. There are further Microsoft Word tips that you might investigate in order to improve your workplace productivity. By devoting the necessary amount of time and effort to this application, you will quickly become an expert in the process of simplifying your productivity in Microsoft Word.