5 Easy Ways to Convert to a Dynamic Disk

Convert to a Dynamic Disk, Are you looking to convert your basic disk to a dynamic disk? Dynamic disks offer numerous advantages over basic disks, including support for advanced features like software RAID, volumes spanning multiple disks, and more. In this article, we will explore five easy methods to convert your disk to a dynamic disk, ranging from built-in tools to third-party software. So let’s dive in!
When it comes to managing your storage drives, there are two primary types of disks: basic disks and dynamic disks. Basic disks are the traditional storage format that most users are familiar with. They support basic partitioning schemes like primary partitions, extended partitions, and logical drives.
Convert to a Dynamic Disk, On the other hand, dynamic disks provide advanced functionality and flexibility. They allow you to create dynamic volumes such as spanned volumes, striped volumes, mirrored volumes, and RAID-5 volumes. These dynamic volumes provide benefits such as increased performance, fault tolerance, and the ability to extend volumes without the need for reformatting.
Read More: Scan Disk Windows: 14 Easy Ways
Understanding Basic Disk Concepts
Convert to a Dynamic Disk, Before we delve into the conversion methods, let’s have a quick look at the basic differences between primary disks and dynamic disks, along with the advantages of using dynamic disks.
Primary Disk vs. Dynamic Disk
Convert to a Dynamic Disk, A primary disk, also known as a basic disk, follows the conventional storage model. It utilizes primary partitions, extended partitions, and logical drives. Basic disks are suitable for most users and offer straightforward partitioning and formatting options.
On the other hand, dynamic disks are designed to provide more advanced features and flexibility. With dynamic disks, you can create dynamic volumes, which offer additional benefits like increased performance, fault tolerance, and the ability to span volumes across multiple disks.
Advantages of Dynamic Disks
Convert to a Dynamic Disk, Converting your disk to a dynamic disk comes with several advantages. Here are a few key benefits:
- Dynamic volumes: Dynamic disks allow you to create dynamic volumes, such as spanned volumes and striped volumes, which can improve performance and provide fault tolerance.
- Volume extension: Dynamic disks enable you to extend volumes without reformatting or losing data. This flexibility is especially useful when you need to increase the size of a partition.
- Redundancy: By using dynamic disks, you can create mirrored volumes and RAID-5 volumes, which provide data redundancy and protect against drive failures.
- Simplified management: Dynamic disks offer a centralized management console that allows you to manage volumes and disk configurations easily.
Now that we understand the basic concepts, let’s explore the various methods you can use to convert your disk to a dynamic disk.


Converting to a Dynamic Disk: Method 1 – Using Disk Management
Convert to a Dynamic Disk, Disk Management is a built-in Windows tool that enables you to manage your storage devices. It provides a graphical interface for converting basic disks to dynamic disks. Here’s how you can convert your disk using Disk Management:
- Opening Disk Management: Press Win + X and select Disk Management from the menu. Alternatively, you can right-click on This PC or My Computer and choose Manage. In the Computer Management window, select Disk Management under Storage.
- Converting Basic Disk to Dynamic Disk: In Disk Management, locate the disk you want to convert. Right-click on the disk and choose Convert to Dynamic Disk from the context menu. Follow the on-screen instructions to complete the conversion process.
- Disk Conversion Considerations: Before proceeding with the conversion, ensure that you have a backup of your important data. Converting a disk from basic to dynamic will render it unreadable by operating systems that do not support dynamic disks. It’s also important to note that system disks cannot be converted while Windows is running.
Converting to a dynamic disk using Disk Management is a simple and straightforward process. However, if you prefer using the command line or third-party software, we have you covered. Let’s explore those options next.
Converting to a Dynamic Disk: Method 2 – Command Line (CMD)
Convert to a Dynamic Disk, If you’re comfortable with the command line interface, you can use the Diskpart utility in Windows to convert your disk to a dynamic disk. Here’s how you can do it:
- Launching Command Prompt: Press Win + R, type cmd, and hit Enter to launch Command Prompt.
- Using Diskpart Utility: In the Command Prompt window, type diskpart and press Enter. This will open the Diskpart utility.
- Converting Basic Disk to Dynamic Disk via CMD: Within Diskpart, use the list disk command to identify the disk you want to convert. Then, select the disk using the select disk command, followed by its corresponding number. Finally, use the convert dynamic command to convert the disk to a dynamic disk.
Convert to a Dynamic Disk, Using the command line method provides more control and flexibility over the conversion process. However, it requires a good understanding of the command prompt and disk partitioning.
Converting to a Dynamic Disk: Method 3 – Third-Party Software
Convert to a Dynamic Disk, If you prefer a user-friendly graphical interface and additional features, third-party software can be a viable option for converting your disk to a dynamic disk. Here are the general steps involved:
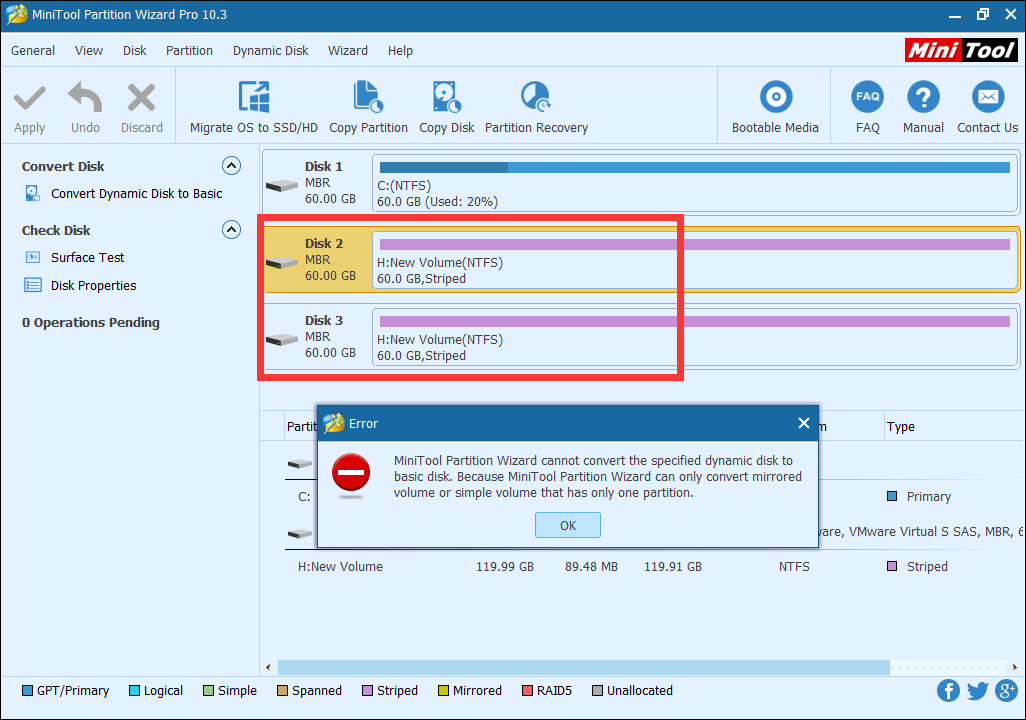
- Overview of Third-Party Software: There are various third-party disk management tools available in the market, such as EaseUS Partition Master, MiniTool Partition Wizard, and AOMEI Partition Assistant. These tools offer comprehensive disk management features, including disk conversion.
- Choosing a Reliable Tool: Research and choose a reputable disk management tool that suits your requirements. Look for features like ease of use, reliability, and customer reviews.
- Steps to Convert Basic Disk to Dynamic Disk using Third-Party Software: Once you have selected your preferred tool, follow the provided instructions to convert your disk to a dynamic disk. Typically, the process involves selecting the target disk, choosing the conversion option, and confirming the changes before applying them.
Third-party software can simplify the conversion process and provide additional features for disk management. Make sure to choose a reliable tool from a trusted source.
Converting to a Dynamic Disk: Method 4 – Disk Conversion Services
Convert to a Dynamic Disk, If you’re not comfortable performing the disk conversion yourself or if you have complex requirements, you can consider professional disk conversion services. These services specialize in disk management and can handle the conversion process for you. Here’s what you need to know:
- Professional Disk Conversion Services: There are companies and service providers that offer disk conversion services. These professionals have the expertise and tools to convert your disk to a dynamic disk.
- Benefits of Professional Services: Opting for professional services ensures that the conversion process is carried out correctly and efficiently. It can save you time and effort, especially if you have multiple disks or complex disk configurations.
- Choosing the Right Service Provider: When selecting a service provider, consider factors such as reputation, customer reviews, pricing, and the specific services they offer. It’s important to choose a reliable provider to ensure the safety of your data.
Convert to a Dynamic Disk, Professional disk conversion services can be a suitable option for users who prefer to delegate the task to experts or require specialized assistance.
Converting to a Dynamic Disk: Method 5 – Reinstalling Windows
Convert to a Dynamic Disk, If you’re planning to reinstall Windows on your system, you have an opportunity to convert your disk to a dynamic disk during the installation process. Here’s how you can do it:
- Full System Reinstallation: Back up your important data and perform a clean installation of Windows on your system. This process involves formatting your existing partitions and reinstalling the operating system.
- Converting Basic Disk to Dynamic Disk during Installation: During the installation process, when prompted to select a disk or partition for the installation, choose the Disk Options or Advanced Look for an option to convert the selected disk to a dynamic disk. Select the option and proceed with the installation.
Convert to a Dynamic Disk, Converting to a dynamic disk during Windows reinstallation provides a fresh start with a dynamic disk configuration. However, keep in mind that this method involves reinstalling your operating system and erasing your existing data.
Convert to a Dynamic Disk, Conclusion
Convert to a Dynamic Disk, Converting your disk to a dynamic disk opens up a world of advanced storage features and flexibility. In this article, we explored five easy methods to convert your disk to a dynamic disk. Whether you prefer using built-in tools like Disk Management, command line methods, third-party software, professional services, or converting during Windows reinstallation, there is an option that suits your needs.
Convert to a Dynamic Disk, Remember to backup your data before performing any disk conversion, as the process involves making changes to your disk structure. Choose a method that aligns with your technical skills and requirements. Enjoy the benefits of dynamic disks and take advantage of advanced storage configurations for a more efficient and reliable storage solution.
Read More: Finding Data on a Dead Hard Disk( Step-By-Step Guide)
FAQs (Frequently Asked Questions)
- Can I convert a dynamic disk back to a basic disk?
Yes, it is possible to convert a dynamic disk back to a basic disk. However, the process involves deleting all volumes and data on the dynamic disk, so it’s crucial to have a backup of your data before proceeding.
- Will converting to a dynamic disk affect my data?
Converting a basic disk to a dynamic disk should not affect your data, as the conversion process preserves existing data. However, it’s always recommended to have a backup of your important data before performing any disk operations.
- Are there any limitations to using dynamic disks?
Convert to a Dynamic Disk, Dynamic disks have certain limitations to be aware of. For example, dynamic disks are not supported by all operating systems, so if you plan to use the disk on different systems, it’s essential to check for compatibility. Additionally, some disk utilities and third-party software may have limited support for dynamic disks compared to basic disks.
- Can I convert a system disk to a dynamic disk?
Converting a system disk to a dynamic disk can be challenging and may require additional steps. It’s generally recommended to consult professional disk conversion services or thoroughly research the specific requirements and considerations for your operating system before attempting to convert a system disk.
- Do I need to back up my data before converting to a dynamic disk?
Convert to a Dynamic Disk, Yes, it is highly recommended to back up your data before converting a disk to a dynamic disk. While the conversion process itself should preserve your data, unexpected issues or errors during the process could result in data loss. Having a backup ensures that you can restore your data in case of any unforeseen circumstances.


One Comment