There are occasions when you require the advanced features of Microsoft Excel, even though Microsoft Word has undoubtedly gotten better over time at handling tables and data.
Just thinking about copying and pasting massive amounts of text, on top of all the formatting, can give you the willies. Converting a table from Word into Excel can be challenging, but this article is here to help.
What are the Benefits of Converting a Word Table to Excel?
While Word is capable of handling basic graphs and tables, Excel is head and shoulders above the competition when it comes to extensive data analysis, strong functions, filtering capabilities, and professional formatting. After all, Word is mostly a word processor, whereas Excel is designed to manage massive amounts of data and complicated computations.
It may be time to convert your table to Excel if you require a more professional look for your tables or if you are dissatisfied with the limited options in Word’s “Table Design” and “Table Layout” tabs.
5 Steps to Convert a Word Table to Microsoft Excel
When converting tables from Word to Excel, formatting becomes an issue. Incorrectly copying and pasting from Word to Excel can lead to mayhem. But if you follow the necessary procedures, the appropriate way is really rather easy:
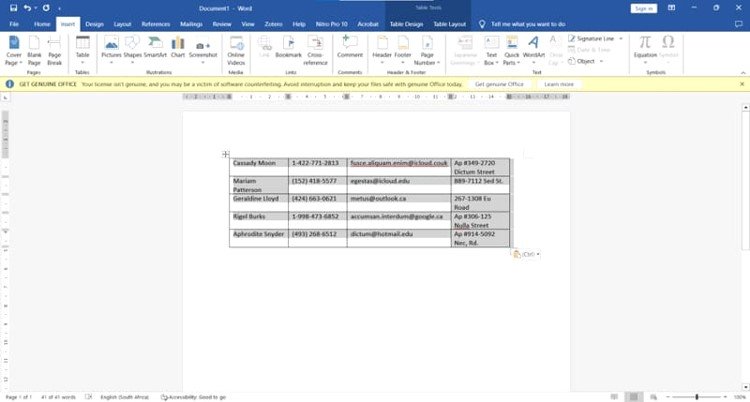
1. To convert all the content in a table in Microsoft Word, either click and drag the content or use the Move icon (four arrows) in the table’s upper left corner.

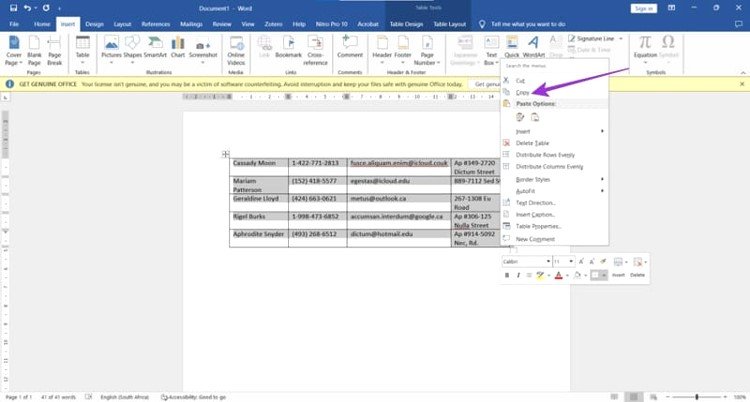
2. Press Ctrl + C on your keyboard or select “Copy” from the context menu when you right-click on the text to copy it. Paste the contents of your current window into the clipboard.

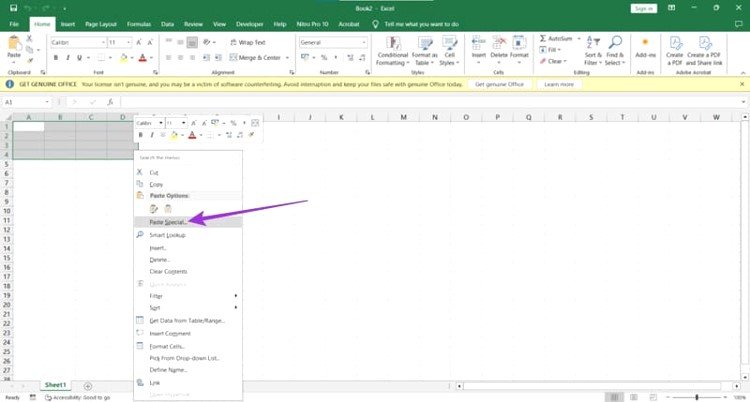
3. To paste your Word table into Excel, click and drag the cells you want to use. If you want to keep the formatting, make sure that the number of rows and columns in Excel are identical to what you have in your Word table.
4. You can access the context menu by right-clicking the selected cells. To paste special, choose “Paste Special” instead of copy.

5. If you want the most seamless transition, insert your Word table as plain text (i.e., without any formatting) by selecting “Text” from the “As” options.

6. Click “OK.”
After you insert your text, you can format it in several ways, such as by changing the width of the columns, wrapping the text, adding borders to the cells, etc.
Alternative Methods
Alternate methods for switching between the two versions of Office are as follows:
Convert the Entire Word Document
Imagine you’re working with a huge Word table that resists the ease of the previous method. To avoid any problems when importing the document into Excel, you can save it as plain text. The process is as follows:
1. You should start by saving a plain text version of your Word document. The “Save As” window will pop up when you hit F12.
2. “Save as type” is located beneath the “File Name” dialog box. After you find the “Plain Text (.txt)” format in the drop-down option, you can save the file to any folder you like.
3. Click “Data” in Excel’s main menu, and then choose “Get External Data.”
4. Pick “From Text” from the menu that appears, and then choose the text file that you saved earlier.
5. Select your preferences and import the file by following the wizard’s instructions.
Converting Text Into a Table
Forming a Table from Text Converting prepared Word material to a table in Excel is an option if you haven’t done it already. You should begin by using Word to transform the text into a tabular format. I will show you how:
1. To make a table out of text in a Word document, simply click and drag the desired text.
2. Find the “Insert” tab and then choose the “Table” option.
3. A drop-down option will show; select “Convert Text to Table” from that.
4. It will bring up the “Convert Text to Table” window. Determine the required number of rows and columns, and instruct the tool to use paragraph, comma, tab, or other delimiters to divide the text.
5. Press “OK” to proceed with the text conversion.
6. Launch the “Save As” window by clicking F12. Then, save your document as a “Plain Text (.txt)” file.
7. To get the “From Text” option in Excel, navigate to the “Data” menu, pick “Get External Data,” and then click on it. Excel also allows you to copy and paste tables as text.How to Import a Word Table into Excel 2010
8. After importing your content, you can modify and format the cells according to your requirements.


