Staying connected in today’s hyper-digital world is more important than ever. With the rise of SpaceX’s Starlink satellite internet service, users can now access high-speed broadband virtually anywhere, including rural or remote regions. If you’re an iPhone user leveraging Starlink, you might wonder how to manage your connection directly from your device. Understanding how to turn Starlink on or off on your iPhone can be crucial for conserving bandwidth, troubleshooting connectivity issues, or simply managing your network preferences more efficiently.
Understanding Starlink and Its Integration with iPhone
Starlink is a satellite internet constellation developed by Elon Musk’s SpaceX, designed to provide low-latency, high-speed internet across the globe. It particularly benefits users in underserved areas with limited access to traditional broadband.
The iPhone, on the other hand, has evolved into a central command hub for digital connectivity. With iOS’s seamless integration capabilities, it can interface with external devices and networks like Starlink via dedicated apps or browser interfaces.
To effectively control your Starlink connection from your iPhone, it’s essential to understand how the system is set up. Starlink typically involves a satellite dish (Dishy McFlatface), a Wi-Fi router, and a mobile app to manage configurations. Apple’s iOS does not offer native controls for Starlink, but the Starlink app provides all the functionality needed to toggle connectivity and perform diagnostics.
How to Turn On Starlink Using Your iPhone
Activating your Starlink connection through an iPhone is a straightforward process but requires proper setup and connectivity. First, ensure your Starlink dish is installed correctly and powered on. Once the system is operational, your iPhone can be used to initiate the internet connection.
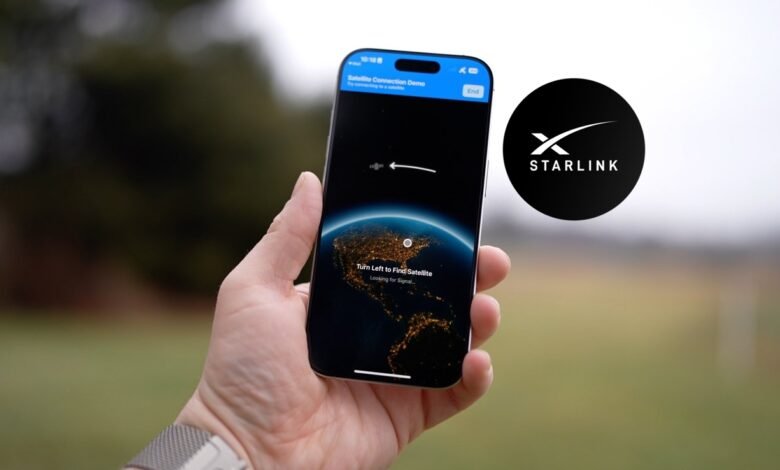
Download the official Starlink app from the App Store. After installation, launch the app and log in using your SpaceX Starlink credentials. Upon successful login, the app automatically scans for your Starlink hardware and provides real-time status updates.
If the system is in standby or idle mode, simply follow the prompts on the app’s main dashboard to initiate the internet connection. You will see options like “Online,” “Connecting,” or “Searching for Satellites.” Tap “Connect” or follow any system-generated prompts to turn the service on. The interface may also allow you to reboot the router or dish, depending on your network’s needs.
Another method involves connecting your iPhone to the Starlink Wi-Fi network. Once connected, you can navigate to the system settings using a browser by typing in the IP address192.168.100.1, which brings up the Starlink local interface. This method is useful if you experience issues with the mobile app or prefer browser-based configuration.
How to Turn Off Starlink from Your iPhone
Disabling the Starlink service through an iPhone also follows an intuitive path. Open the Starlink app and navigate to the settings tab. Here, you will find various network management options, including the ability to put the system in “Sleep Mode,” disable Wi-Fi broadcasting, or fully power down the device.


The Sleep Mode function is particularly useful for temporary disconnection. This mode pauses satellite communication and conserves power without a complete shutdown. For a full shutdown, use the advanced settings to manually power off the router or disconnect the dish. Note that turning off Starlink from your iPhone does not physically power down the hardware but halts the network functionality.
For users experiencing app issues or those who prefer a manual approach, logging into the local interface via a browser again becomes useful. Once logged in, you can access detailed settings to disable connectivity or reset the device.
iPhone Compatibility and iOS Requirements
The Starlink app is optimized for iPhones running iOS 14.0 or later. It supports Face ID and Touch ID for secure login, push notifications for system alerts, and real-time analytics for connection strength and satellite visibility. To ensure optimal performance, always keep your app and iOS version up to date.
The app is compatible with a range of iPhone models, including iPhone 8 and newer. Performance on older models may vary, particularly if the iOS version is outdated or if the device has limited processing power for handling real-time network diagnostics.
Why You Might Want to Toggle Starlink On or Off
There are several practical reasons to turn Starlink on or off using your iPhone. In mobile environments like RVs or yachts, Starlink provides on-the-go internet access that may need to be paused when stationary or to conserve battery. For homeowners in rural areas, disabling Starlink during periods of disuse can save energy and reduce satellite congestion.
Toggling Starlink off during network troubleshooting is another valid reason. Rebooting or resetting the device can often resolve connectivity issues or latency problems. If you’re experiencing frequent dropouts, toggling the connection may help refresh satellite alignment or IP configurations.
Another critical use case involves data caps. Although Starlink now offers plans with high data thresholds, some users may prefer to turn off the connection during non-usage hours to preserve bandwidth for priority tasks like remote work or video conferencing.
Security and Privacy Considerations
Using your iPhone to control Starlink offers both convenience and potential security risks. Always use secure passwords and enable two-factor authentication (2FA) for your SpaceX account. The Starlink app supports biometric authentication, enhancing security by restricting unauthorized access.
Avoid connecting to your Starlink router via unsecured Wi-Fi networks or jailbroken iPhones, as this increases vulnerability to cyber threats. Make sure that firmware updates are regularly applied to both the Starlink hardware and your iOS device.
Enhancing Your Starlink-iPhone Experience
For users looking to maximize the synergy between their iPhone and Starlink setup, consider integrating smart home systems or mesh networks. Devices like the Apple HomePod or third-party routers compatible with HomeKit can extend and manage Starlink’s signal more efficiently.
Additionally, using apps like Speedtest by Ookla or Network Analyzer on your iPhone can offer deeper insights into your network’s performance. These tools can identify signal drop-offs, help map coverage zones, and optimize device placement.
Pairing Starlink with VPN services on your iPhone can also boost online privacy and bypass regional restrictions. Some VPNs are even optimized for satellite connections, helping minimize latency and improve stability.
External Resources for Further Learning
To expand your understanding of managing Starlink through iPhones or other devices, consider checking the Starlink Support Center, which offers extensive documentation and troubleshooting guides. The Apple iOS User Guide is another valuable resource for mastering network settings and app configurations.
Frequently Asked Questions (FAQ)
Can I turn Starlink on or off remotely with my iPhone?
Yes, as long as your iPhone has internet access and the Starlink system is connected to power, you can manage it remotely via the Starlink app.
What if the Starlink app is not working on my iPhone?
If the app fails to function, use Safari or another browser to access the Starlink local interface via.192.168.100.1 You may also try reinstalling the app or updating your iOS.
Does turning off Starlink on iPhone stop all internet access?
Yes. Turning off Starlink or putting it into sleep mode halts the internet connection until it is manually re-enabled.
Is there a way to schedule Starlink to turn off automatically?
As of now, Starlink does not offer native scheduling. However, third-party smart plugs or automation systems may provide indirect scheduling capabilities.
Do I need a special iPhone to use Starlink?
No special model is needed, but it’s recommended to use iPhones running iOS 14.0 or later for optimal performance.